Showing posts with label projects for cheap people. Show all posts

Sunday, October 27, 2013

Watch out for snakes!

Happy Halloween!  If you get inspired by this post and want to recreate this project you better hurry because Halloween is only four days away!  I say this as someone who just barely finished this project in time for its intended holiday.  It is going to look pretty awesome for these next few days though.

Pretty sure this was originally a Martha Stewart idea but then again, what isn't now a days.  Martha, you wily dame.  This Halloween wreath only requires two things, a plain stick wreath and snakes of various sizes.  If either the wreath or snakes are not black, fix this with matte black spray paint.      


This snake close up is for my friend/nemesis Ed who hates snakes.  Though I don't think he even reads this blog.  Which makes it a lot funnier to me.  These pictures are just out in the world now, waiting to be discovered.

Hi, friend!

Pictured below is the now black wreath along with a package of already black tiny snakes that was also picked up from Dollar tree.  The large snakes are drying in the garage during this picture.


Again, this one's for you Ed.

Let's be BFFs!
Here the large snakes make their grand reappearance sans white stripes.  However, only two survived the spray painting process.  I have no idea why, since the snakes were spray painted at the same time in the exact same manner, but the paint on the third snake would not dry.  It just stayed tacky and gross.  Maybe primer would have helped.  So try that if you try this.


To add the snakes to the wreath, I wove them through the sticks that made up the wreath.  No glue required.


In this picture, you can see how the snakes are woven through the branches of the wreath to hold them in place.


AH!  Spooky snake wreath!  Taken at night to help add to the spookiness.  Or because that's when I took the picture and didn't want to wait till tomorrow since Halloween is already so close.


Close up shot of the wreath.  To hang the wreath, I used a clear 3M hook.  I was skeptical on these hooks only because the last time I used them to hang my belts up in the closet all my belts fell down.  Could be because I never waited the required hour before hanging something on them.  Directions, it turns out, are sometimes there for a reason.


Another closer up.  I hate you Ed.


So this turned out pretty cool, right?  I like the monochromatic look.  From far away, it looks like a regular black wreath.  Unassuming.  Unthreatening.  Then BAM!  Snakes all up in that door decoration.

Watch out for snakes.  

Wednesday, September 5, 2012

It's not bad spelling, it's a love for Gary Larson

For the last couple months, I've been on a major cleaning kick.  Each and every closet, nook, and cranny have been cleaned out, sorted into keep/sell piles, and reorganized.  During this process, several items turned up that I initially planned on discarding but instead decided to give them a new purpose.

For example, how many of these Christmas popcorn tins have you been given, devoured, and thrown away?  At least one a year since you've been alive?  Yea, pretty much.  Found this empty one in the bowels of our garage and realized with a little tweaking, it would make an ideal container for cat food.


Now, as much as I love Christmas, the current mother and baby deer chilling in the snow (ha, see what I did there) print isn't really jiving with the overall look of our kitchen so it needed to be spray painted.  First things first, the whole tin was cleaned up, dried, and the stickers on the lid were removed.  A few coats of white spray paint later and we have this.


We're not done yet faithful readers!  Using some form of wizardry (Photoshop) and his ridiculous collection of fonts, the husband whipped up two stencils for this adventure.


Kitties!
On to the stencil making!  My current method for creating stencils is using sign vinyl.  The hubs picked up a roll for his own project of dying disc golf discs (shameless promotion for MTP Designs) and I've used it for loads of other stenciling projects.

For this approach, a light box is required however you can also MacGyver something together like I did and use a desk lamp with an end table that has a glass top.  Recently, I saw another DIY version where a bare bulb is placed in a large, clear, plastic container which seemed crazy easy/cheap to throw together.

Anyways, to get started, tape the picture to the bottom of the sign vinyl to keep it held in place while it's being cut.  When everything is sitting on the light box, the picture will be clearly visible as pictured below.  Next, cut out the stencil using enough pressure to cut the vinyl  but not so much that the paper backing is cut.  It's easier than it sounds, I promise.


Once the cutting is done, remove the pieces to end up with something like below.  Now, here is my favorite reason for using this vinyl.  No stencil islands.  See how the eyes on Yigs and the facial details on Hobbes are not connected to an outside edge?  Stencil sections like this are called islands and are normally a no-no beacuse it is a pain/near impossible to transfer them onto whatever is being stencilled. 


Not so with sign vinyl.  Apply masking tape to the top of the stencil so when the backing is peeled away, the masking tap holds the islands in place for easy transferring.


Along with the kitties and Cat Fud stencil, I also added a few strips of vinyl for added detail.  It's a bit hard to see in the picture but there are two small strips at the top and a larger one at the bottom.


After the stencils have been applied, spray paint the tin again with the second color of paint. 


Next comes the moment of truth when the stencils are removed to reveal how awesome or possibly how terrible everything turned out.

Success!!


Never ending staring contest.


Here is how the cat feeding corner looked before....


And how it looks now.

Kitten added for extra authenticity.
For safety reasons, whether real or created in my crazy head, I also sprayed the tin with a few coats of clear sealant and let it sit in the sun for a couple days so everything could fully cure and air out.  Once all that nonesense was out of the way, I dumped in the cat food, threw in an old measuring cup to use as a scoop, and we were ready to get this kitten feeding party started.


And the comic that started it all.  Gary Larson, thanks for being so awesome.


Tuesday, August 14, 2012

Freezer Fun Time

I, like many bloggers, have a day job to pay the bills and keep my cats alive.  My work day starts at 6:30AM and ends at 4:00.  This means my day gets going way before I am anywhere near ready to eat breakfast which is why I wind up eating at my desk halfway through my morning.  Now, that the boring part of this story is out of the way, let me just say I love breakfast burritos.  That’s what this whole post comes down to.  The lobby of my building has a food cart that sells breakfast burritos that I want to devour every single day.  However, at $3.50 a pop, the cheap side of me just couldn’t shell out the cash.  

So I decided to make my own.  And it was amazing. Made the burritos at home, froze them, and pulled one out of freezer the night before I planned on eating it.  Two minutes in the microwave and I was in breakfast heaven at my work desk.  Doing this got me on a freezer food kick and I started prepping other foods to be frozen so that I would have a steady supply of grub that was ready to go after a little reheating.  One or two days a month now, I’ll spend a few hours cooking and restocking my freezer. 

This month I made a new batch of breakfast burritos, black bean quesadillas, turkey meatballs, and a huge batch of spaghetti sauce.  

My staple go-to food for Freezer Fun Day is spaghetti sauce.  It is my go-to Sunday dinner when I’m feeling lazy because it’s Sunday and that’s what Sundays are for.  Pull a bag of sauce out of the freezer and throw it into a pot on low.  Let it reheat as I cook up some whole wheat pasta and broccoli.  Dinner’s ready to go in 20 minutes.        
 

The recipe for this spaghetti sauce came from my Grandpa and is very simple but flavorful.  It consists of tomato sauce, an onion, some wine, a little ketchup, and then brown sugar and spices.  No meat, no other veggies, just a great minimal sauce.  This is one of those dishes that my Grandpa never needed a recipe for and didn't even know the actual proportions of the ingredients.  He just eyeballed everything and it turned out great every time.  My mom managed to preserve his delicious concoction by watching him make it a couple times and figuring out everything he did.   


Saute the onions in a little butter until translucent.  Add remaining ingredients to pot and simmer on low for 2-3 hours.  Done and done.  When I'm doing a freezer cooking day, I always start the spaghetti sauce first.  By the time I'm done fixing all my other food, the sauce is done and ready to be bagged up. 


Once the sauce has cooled down, I measure out 2 Cups and transfer it into labeled freezer bags.  


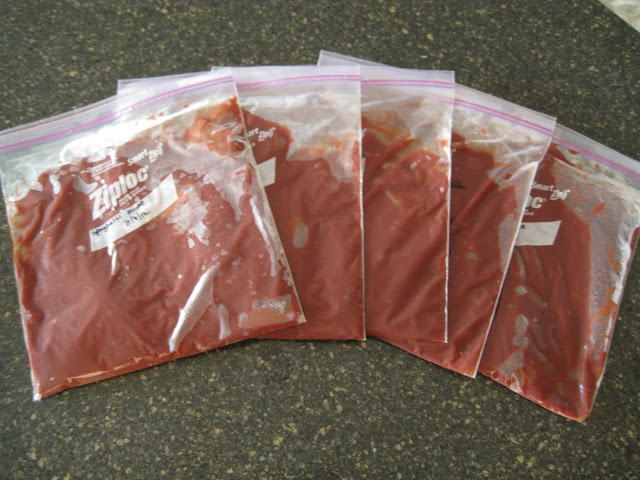
One of these bags will be enough sauce for dinner and leftovers for lunch for both my husband and I.  Those with more than two people (not including our cats, they don't like Italian food....I think they may be racist) in their family will probably need to adjust their portions so you may not end up with five freezer bags but either way, this is a great time/money saver.

Also, little trick I found, when freezing sauces or soups, lay them flat in the freezer until they're frozen.


Once the bags solidify, they can be stacked upright in the freezer for easy viewing access and it saves space.

I am unashamedly proud of how organized my freezer is.
After my sauce was simmering, I started in on my next freezer food, Chinese Style Turkey Meatballs.  This was a new recipe found on Pinterest (seriously, where else?) and I was super excited to try it out because meatballs freeze extremely well and turkey is one of my favorite meats to cook with.  I find it absorbs flavors much better than ground beef which is usually why I end up substituting ground turkey for beef in most recipes.  The original recipe called for cilantro which I opted to leave out.  Mainly because I didn't have any and didn't want to go back to the store.


Mix all the ingredients together and portion out into meatballs.  To keep the size of the meatballs uniform, I use a tbsp cookie scoop to portion out the balls (hehe...balls) and then roll them into adorable little meat spheres. 


After 20 minutes in the oven at 400 degrees, we have these.  Yum!


Once the turkey meatballs had cooled, I divided the whole batch in half and put away in bags.  One bag is enough for dinner and lunch the next day.  Cook up some brown rice and a vegetable (steamed peas?), mix together the sauce for these, and dinner is ready to go in an hour but that's only because rice takes forever to cook. 


While the turkey meatballs were cooking in the oven, I assembled some black bean quesadillas that I could easily take into work for lunch.  This is another Pinterest found recipe but I was surprised I hadn't thought of making these before.  I make quesadillas at least once a week.  Most leftover meat (like steak) ends up in a quesadilla.  In conclusion, quesadillas are awesome. 


Drain and rinse the black beans, chop up the onion and garlic, shred some cheese, mix everything together, and divvy out the mixture between tortilla shells.


Once all my tortillas were stuffed, I wrapped them in parchment paper and filled up some more freezer bags.  These could easily be made with your favorite kind of meat as well, just cook it up and toss it in with the rest of the ingredients.   


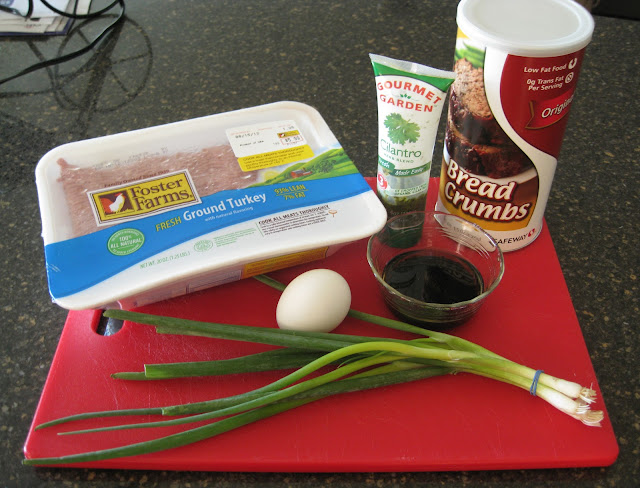
Now, for the feature player in our freezer food party, the breakfast burrito.  With six simple ingredients (tortillas not pictured, they're camera shy), an awesome ready-to-go breakfast is only a few moments away.  Well, more like 30 minutes but that's still not very much time.    


Cook up the sausage until all the pink is gone, drain meat to remove excess grease.

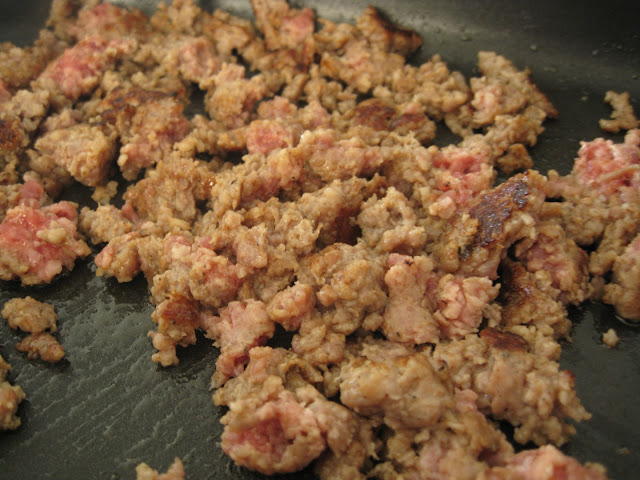
Wow, half cooked pork looks pretty gross close up....don't eat your sausage if it looks like this....
Next, dice up the red potatoes and onion and cook in a skillet, covered, for about 10 minutes until the spuds are easily pierced with a fork. 


While the potatoes and onions are cooking, I whisk together a dozen eggs with a splash of milk plus some salt & pepper. 


Once the potatoes are done, I dump the already prepared egg mixture directly over them and cook.


Once the eggs have cooked, I turn off the heat and mix the sausage and around 3/4 cup of cheese into the potato and eggs combo.


Before burritoizing the breakfast mixture, it helps to wrap the tortillas in a damp paper towel and microwave them for 20 seconds or so.  Helps loosen everything up so the shells are less likely to tear as they're being folded up.


This one batch produced 12 burritos that cost under a dollar to make.  Compared to the $3.50 burritos at my work, that sounds like a good deal to me.  Plus, my burritos are better.  Fact. 


Prior to freezing, let the burritos cool, and then wrap them individually in paper towels.  When you feel like having some breakfast burrito goodness in the morning, pop one of these out of the freezer the night before and let it defrost in the fridge.  Without removing the paper towel, microwave for two minutes, flipping the burrito over after one minute, and then enjoy!


So there we have it.  For around $40 in groceries and a couple of hours time, I ended up with five bags of spaghetti sauce, two big servings of turkey meatballs, 10 black bean quesadillas, and 12 breakfast burritos.  Spending $40 to get the bones of over 20 quick & easy meals is pretty satisfying.  Eating breakfast and lunch at work just got way better. 

Aside from you know, eating two meals a day at my desk which is kind of lame.  Plus side, it does allow me to catch up on Batman comics so it could almost be called a win.     

Wednesday, August 1, 2012

Towel Bars Beware II: Towel Barred Harder

Wow....that title sounds unfortunate.

So when we last left off, this shelf had been built but not hung in its rightful place.  Unfortunately, since I built this shelf from scratch, it didn’t come with any hanger thingys already attached.  Weird, I know.


After a quick bit of research, the hanging hardware of choice that ended up on the back of this baby was keyhole hangers.  According to the couple of DIY pages the internet shared, these would be strong enough to hold everything up, lay relatively flat against the wall, and be easy to install.  So easy to install that I offer you four steps to attaching your very own keyholes hangers to a shelf or other apparatus that is in need of hanging.    


Once all four extremely crucial steps have taken place, TA-DA, a shelf can be hung.


Man, taking a picture of a bathroom that has no windows with a camera without a wide angle lens is tough.  But, I did the best I could.  To make up for the quality, I've included a cat butt in the below picture.  You're welcome.  This is what our bathroom wall looked like prior to the detowel barring. 

Blurry cat butts make everything better
 Now, truth be told, I've never removed a towel bar from anything before but luckily, it ended up being crazy easy.  The one tricky part was actually removing the screws that hold the bar to its wall hanger.  The only screwdriver on hand that was small enough came from a glasses repair kit but I couldn't get a grip on it enough to turn the screw hence the appearance of the needle nose pliers in Step 1.    


Once the wall was all spackled and sanded, it was time for paint.  This was the point where I realized that we have a lot of blue walls in our house therefore creating an excess of half full paint containers that are also blue.  Thankfully though, my husband was smart enough to label the paint cans appropriately.  Yep, prepare for bathroom adventure time. 

After the agonizing wait of allowing the paint to dry (no picutres of this because seriously, you want to see a picture of drying paint?), it was time for the hanging.  Now, I was home alone during this step so I couldn't get the fella to snap a picture so I tried to recreate it on the floor.  Just imagine the below picture happening 4 1/2 feet up.


"What's up with the ruler?", you may be asking.  "Pinterest" would be my reply.  Little life hack I came across after being on Pinterest for a gabillion hours.  Take a ruler, nail a small nail through it about an inch from the bottom, and you have created the most handy tool ever for hanging things.  In this case, place the nail inside the keyhole hanger (where the screw will be going), place shelf on wall, once proper placement is found, gently press the shelf against the wall which in turn will press the nail in the ruler against the wall.  The nail will make a small mark showing exactly where the anchor and screw need to go.  I've used this ruler/nail tool a dozen times to hang pictures up in our house and it's awesome.  No more guessing or measuring needed to hang pictures up in the correct spot the first time.

My process for this portion of the project was to use the ruler hanger to mark where the left anchor and screw would go.  Once those were installed in the wall, I hung the shelf on it and using a level and my ruler tool, was able to easily mark where the anchor and screw for the right side should go.

I also added some felt cirlces to the bottom two corners of the shelf to help stop any bumping around plans this sucka may have had. 


Once everthing was said and done, our bathroom looked a little something like this.  Or exactly like this.  It is a picture afterall. 


No more linen origami.  No more straightening out haphazard towels.  NO MORE TOWEL BAR. 

Here's a nice Before/After shot of the bathroom. 

To be fair, the cat butt does add a little something extra to the Before picture
I love it.  The shelf offers space to display some cool knick-knacks which currently consist of a ceramic octopus I bought BJ for Christmas last year, a glass bottle filled with agates and sea glass, as well as another bottle filled with beach sand. My family used to go to Newport beach every summer when we were all little so I wanted to take a bit of the beach with me on our final trip.  The octopus prints are also hung a bit higher than previously which I think adds some nice scale to the walls/ceiling.

And, the most crucial point of this entire endeavor, no more towel bar......or is there....BUH BUH BUUUUUUDUUUUUHHHHHHH.